
Making seed tapes are a good project for doing with children and those that have physical limitations that can keep them from spending much time in the garden. The seed tapes can be made in your home and be ready for planting when Spring comes.
Seed tapes are an easy way for children and gardeners to make sure that tiny seeds like lettuce, carrots and many flowers are spaced according to directions on the seed pack. This will eliminate the need to thin the rows when the seed sprout and you will be able to save seeds without waste. It also prevents the need to thin a row which may disturb the roots of your seedling. With the seed tape, seeds are already spaced out, and easy to plant.
SUPPLY LIST FOR HOMEMADE SEED TAPE
- Use a washable, non-toxic school glue (like Elmer’s) or, make your own homemade glue using 2 TBSP white flour and 1 TBSP water. Make sure the flour glue is not too watery or the seeds will absorb the water.
- Scissors
- Toilet paper or paper towel, depending on desired size
- Marker or ball point pen
- Chopstick or toothpicks

MAKING HOMEMADE SEED TAPE
- Unroll the toilet paper or paper towel to desired length. If you only have two-ply toilet paper on hand, split the two layers. Fold toilet paper in half horizontally, then unfold it to make a crease. Decide how long you want to make your tape. Cut the paper to that length. (With children making the tape 12 or 18 inches seems to work best. If you want to make it the length of the area you will be planting, measure the area and cut the paper that length.)
- Place a measuring tape or ruler on a flat surface and unroll your toilet or paper towels paper to that length.
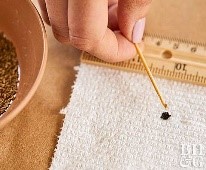
- Reference your seed packet to determine how far apart your seeds need to be from one another (for example, carrots would need to be about 3 inches apart from each other). With a ruler and a marker, mark seed location within the crease on the paper, starting about 1 inch from the edge.
- Place Seeds – Put a drop of glue on the spot you have marked on the paper. Pick up one seed with the toothpick and place on the glue drop on paper.
- Seal Together -Fold the toilet paper in half over the seeds, pressing lightly over each seed to “seal” the toilet paper sandwich.
- Using a ballpoint pen, label one end of the paper with the name of the seed, and what kind of plant it will be.
- Let strip sit for about two hours, or until glue dries. To store, roll up the seed tape and store in a cool, dry spot until you are ready to plant.
When it is time to plant, simply check the seed package for appropriate planting depth, clear a small area in the garden the depth you will need to plant the seed tape, place the unrolled seed tape there, and cover with soil. If you are planting things such as carrots (1/4 inch) that barely need to be covered with soil, lay the tape on top of the planting area, and simply sprinkle loose soil on top. Water just as you would in-ground seeds.
Helpful tips:
- Want to make seed mats for the square foot gardening method? Use napkins or paper towels.
- This works best for teeny tiny seeds like herbs, greens, and carrots. For heavier seeds (beans, peas, watermelon, etc.,) it is best to just plant them directly into the ground.
The author of this article, Rachel Dutton, is a Paulding UGA Extension Master Gardener. Master Gardeners are trained to provide education for homeowners on horticulture, sustainable landscaping, and environmentally friendly gardening practices using unbiased, research-based information from the University of Georgia. For more information, contact University of Georgia Cooperative Extension in Paulding County to speak with a Master Gardener or County Extension Agent at 770-443-7616 or view our online resources at www.ugaextension.org/paulding.