Podcasts. All about the Pod and the Talkin Cotton Podcast was released late last week.

In this episode, Drs. Scott Monfort, Mark Abney, Wes Porter, Bob Kemerait, and Eric Prostko discussed the current crop situation, and pest management.

Below is a link to season 2, episode 13 of the Talkin’ Cotton Podcast, which is a discussion on later plantings and thoughts entering bloom.
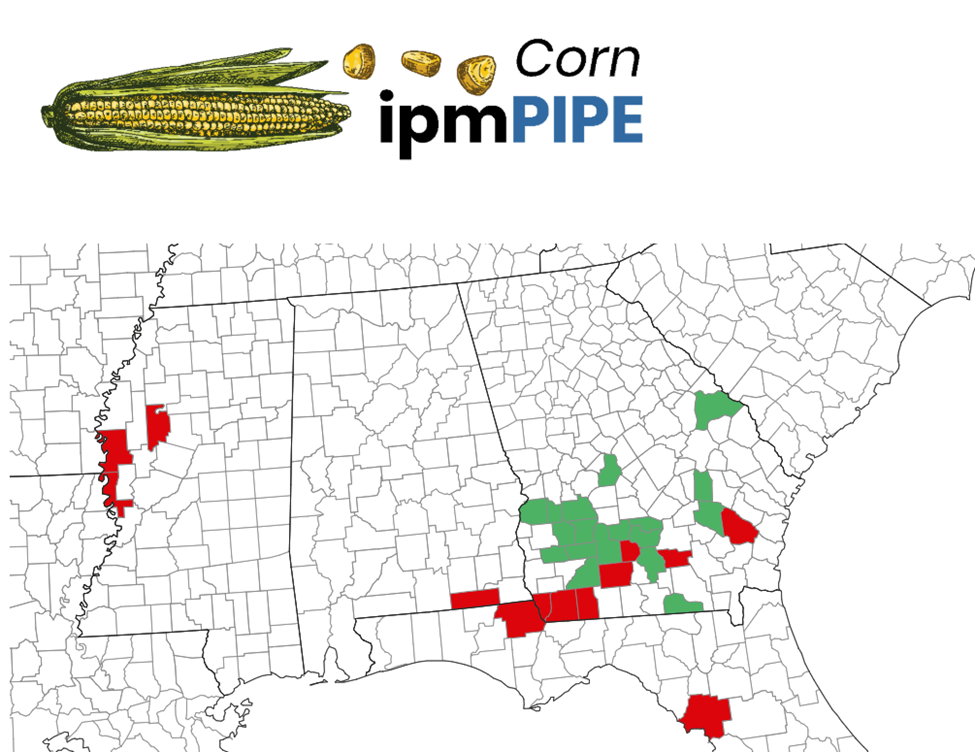
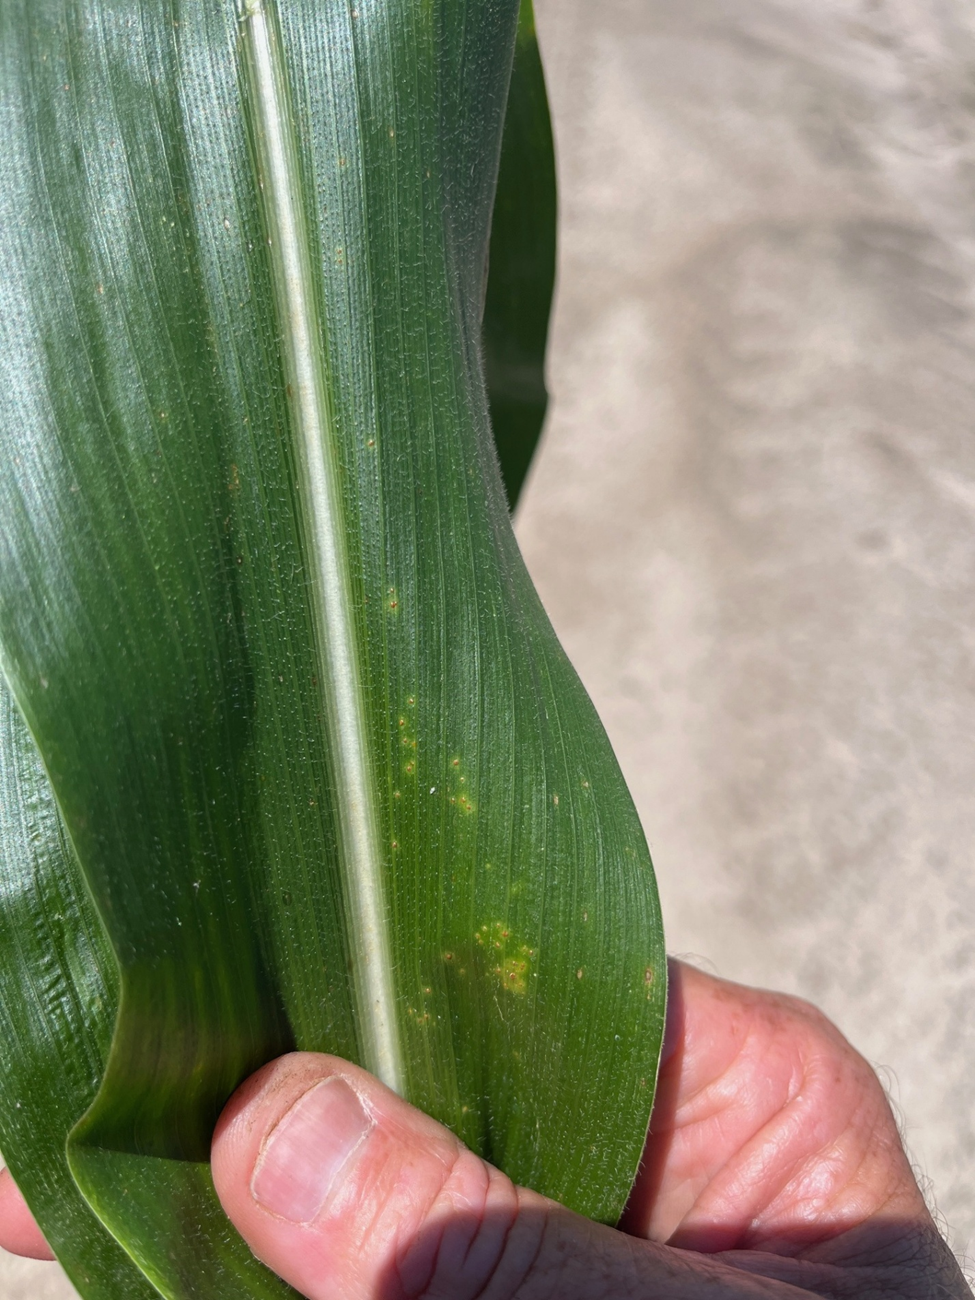
Corn: The local corn crop ranges from blister stage until early dent. Low levels of Southern rust was found in Colquitt County last week (June 17, 2025) in a field that was close to dough stage. Below is the most updated Southern Rust map (June 22, 2025) showing all the counties in the Southeast that have confirmed cases of rust.
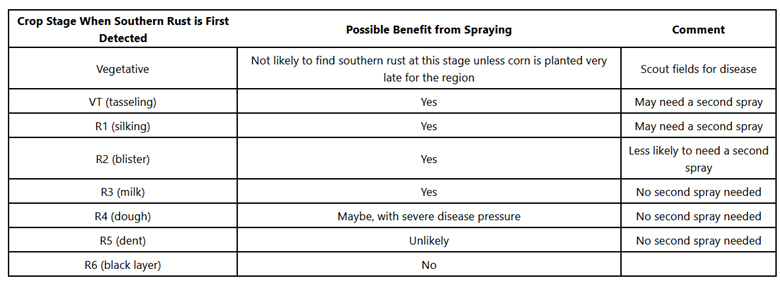
I had a question or two about if a second application is needed for the management of Southern rust in corn. The table below provides possible benefits from applying fungicides based on when southern rust is first detected in an area based off crop stage. The table is from the Crop Protection Network.
Growth Stages in Corn. I have received a question or two about reproductive stages of development in corn. Below is a table from Ohio State information sheet A Guide to Corn Growth and Development.
| Growth Stage | Description |
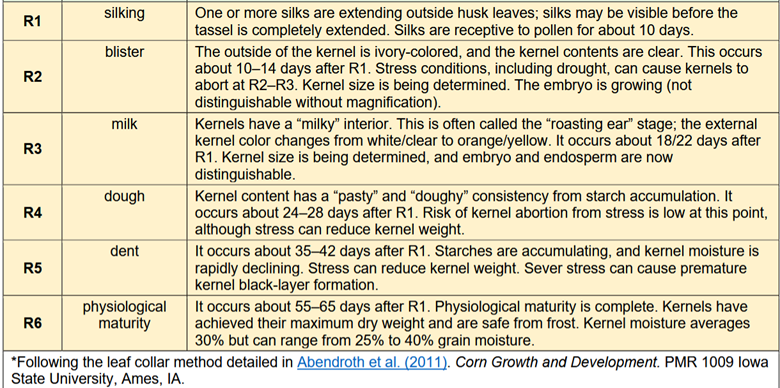
Another great resource is from Mississippi State. https://www.mississippi-crops.com/2024/06/15/identifying-corn-reproductive-stages-and-management-implications/
Cotton: The local cotton crop ranges from just planted to 1st bloom. According to the UGA Water Team, Crop water requirements increase dramatically from squaring and flowering. From 30 days to 50 days after planting, water consumption almost doubles. Keep this in mind as we move into middle and late June, and into early July. Don’t fall behind on your irrigation once the crop reaches squaring and into flowering. Conversely, don’t over-irrigate the crop as there are yield penalties for doing so. Remember that if you have been using soil moisture sensors, be sure you are irrigating based on the crops actual root zone and not the entire length of the sensor. Root growth and water usage will dramatically increase at deeper depths as the cotton moves through squaring and into bloom during mid to late June and early July. As we move through the season, we will need to be more balanced as the season progresses and root growth increases. One last consideration, top dressing all cotton and our first dose of growth regulator on irrigated aggressive growing cotton will soon or has already occurred. Don’t go into this stage with the mindset of “I’m going to hold back on the water now because I don’t want it to take off”. If proper growth regulator is applied, it will prevent vegetative growth as it should. If rain chances are low, irrigation will be required to get the fertilizer in the plant by irrigating it in and allowing the plant to uptake the nutrients.
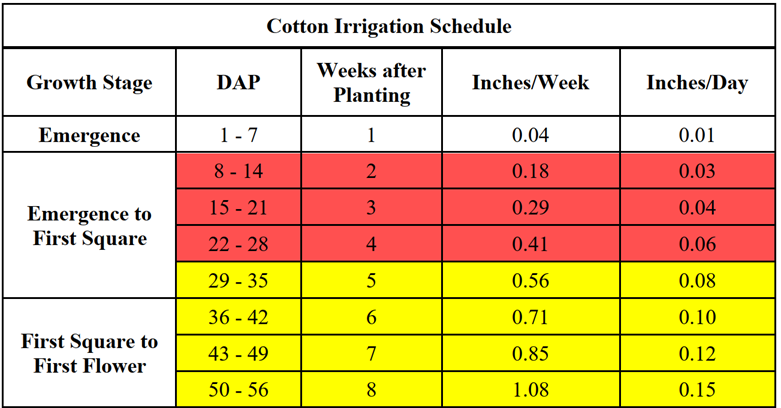
The Irrigation Reference Guide for Corn, Cotton, Peanuts, and Soybeans | UGA Cooperative Extension shows estimated water requirements in both days after planting and estimated growth stage, based on the physiological progression of the crop it may be better to look at the growth stage and not the DAP.
In my last email update Dr. Phillip Roberts, UGA Cotton Entomologist, had some interesting points in his last article in the June edition of the UGA Cotton Newsletter.
Pre-Bloom Management: Management is focused on adult plant bugs migrating into cotton from alternate host plants. In addition to monitoring square retention, a 15-inch diameter sweep net should also be used to sample adult plant bugs. Historically, early-planted cotton is at higher risk of pre-bloom plant bug infestations. The goal of plant bug management prior to bloom is to maintain 80 percent retention as we enter bloom. Plants with over 80 percent retention at first bloom have maximum yield potential. READ MORE
Peanuts: The peanut crop ranges from 2 weeks to 60 days old. Dr. Bob says “white mold programs” typically begin at about 60 days after planting when the peanut canopy is larger and more at risk for disease spread, growers should consider putting something out at 45 days after planting for management of this disease. I believe a more aggressive white mold program is justified this season because of early-season conditions and the potential for shorter rotations between peanut crops. Growers can initiate a “white mold” program by one of three ways.
1. Mix 7.2 fl oz of tebuconazole with a leaf spot material, for example chlorothalonil.
2. Use products like Priaxor or Lucento that have fair white mold activity in addition to strong leaf spot control.
3. Initiate the 3-spray Elatus (7.3 oz) or Excalia (2.0 fl oz/A) programs, noting that additional fungicide should be added for protection from leaf spot.
For several reasons beyond those mentioned above, June is a critically important month for disease management and, sometimes, for nematode management as well. Based on planting date, most of the peanut crop will be between 30 and 45 days after planting at some point in June. Thoughts for consideration include the points below.
1. Fungicide programs for management of leaf spot diseases (except for the earliest and latest-planted peanuts) are typically initiated during the month of June. Leaf spot programs should begin closer to 30 DAP when A) the field is at higher risk to leaf spot based upon results from Peanut Rx, and/or when B) fungicides to include chlorothalonil, Mazinga, chlorothalonil + Domark, and chlorothalonil + Alto are used as the first fungicide application.
2. Fungicide programs for leaf spot management can safely begin closer to 45 days after planting when A) the field is low-risk to leaf spot diseases as determined with Peanut X, B) fungicides such as Priaxor, Lucento, or Aproach Prima are used in the opening 45-day fungicide application, or C) Velum, Proline, or Propulse is used in-furrow at planting.
3. Growers should avoid, if at all, possible initiating a peanut fungicide program later than 45 days after planting.
4. The “backbone” of most fungicide programs for control of white mold does not begin until approximately 60 days after planting; however growers often start earlier, especially when short rotation increases risk to disease. Effective ways to begin a white mold program within the first 45 days after plantings are to A) apply Proline (5.7 fl oz/A) in a narrow band over the peanuts, B) include tebuconazole or azoxystrobin with your first leaf spot applications, or C) adopt Elatus or Excalia programs that begin as early as 30 days after planting.
5. Applications of Propulse can be made as early as 45 days after planting to fight leaf spot, white mold, and to supplement earlier nematicide applications for control of nematodes.
The “Good”: Timely fungicide applications (before disease is established) are a critically important tactic for controlling disease. Starting your leaf spot program on-time, often in June, sets the stage for a successful disease management program and best yields.
The “Bad”: Getting behind in a fungicide program early in the season may allow disease to become established that is difficult (if not impossible) to manage later in the season. While I know some growers wait until 50-55 days after planting to begin their program, I strongly advise you to not wait later than 45 days after planting and to begin as early as 30 days after planting in a number of situations.
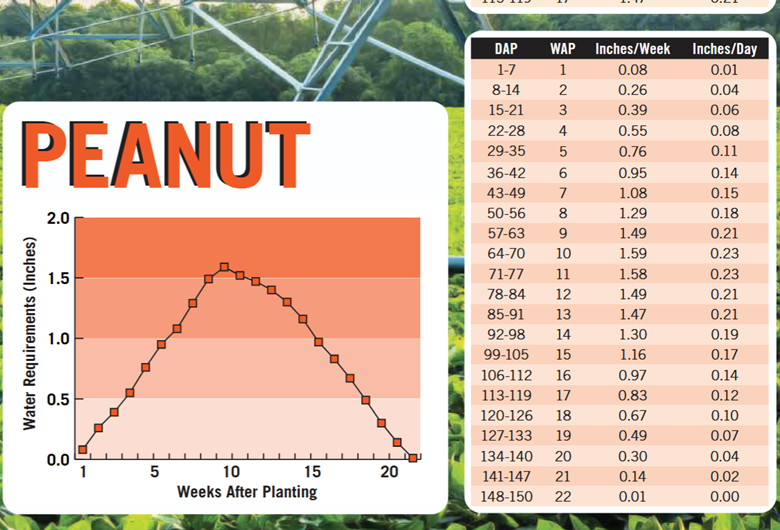
I am starting to see a pivot or two fire up around the county. Dr. Porter, UGA Irrigation Specialist, said the latest All about the Pod podcast that peanuts in the 4-5 weeks after planting window require 0.55 to 0.76 inches per week. Peanuts planted in mid to late April are reaching 60 days after planting and will have irrigation requirements of 1.5 inches per week. Most soils will store an inch per foot of rooting depth, but 50% of that is plant available.
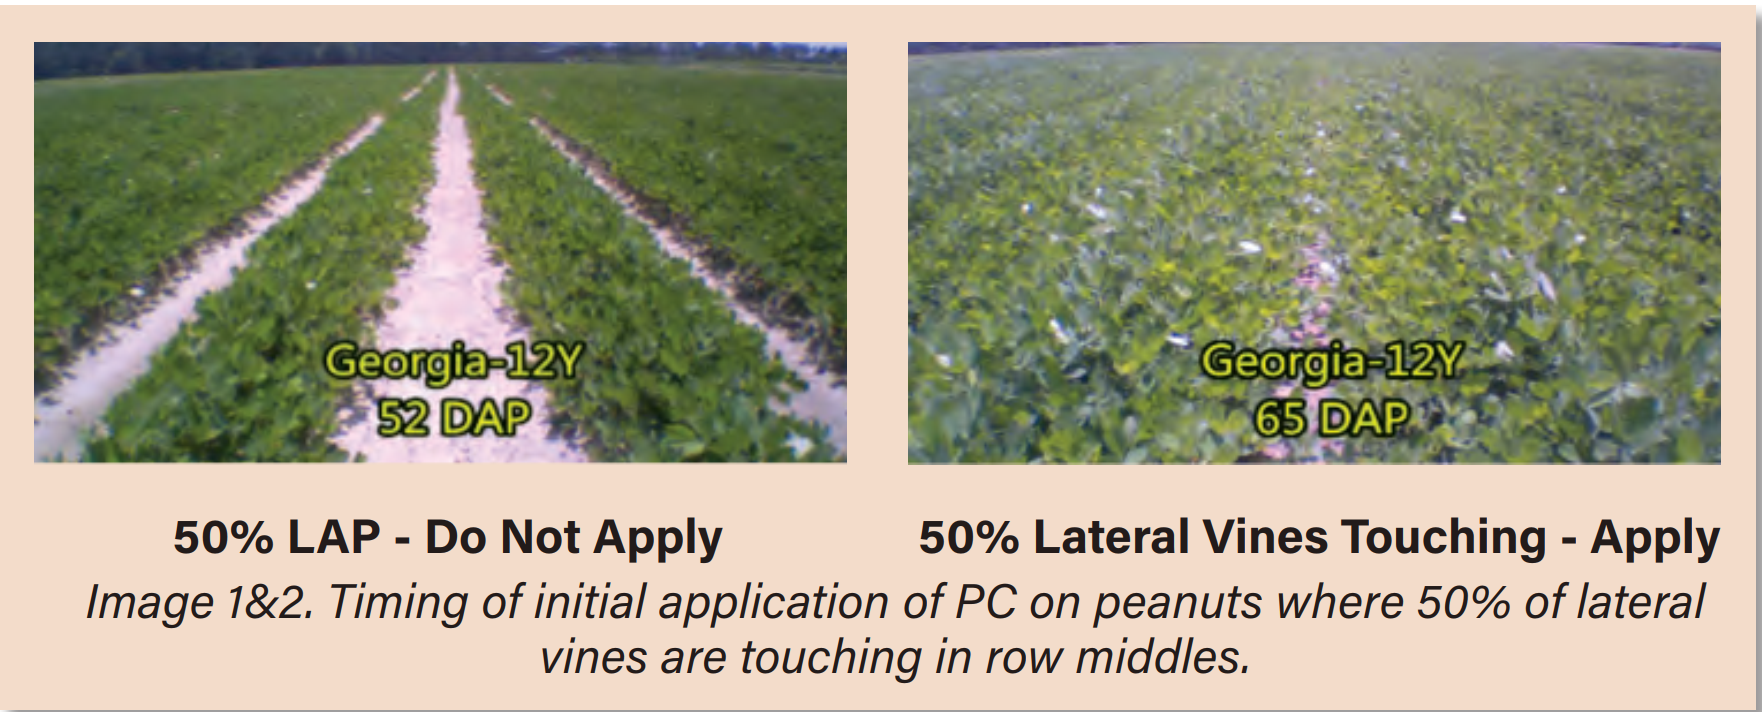
PGR use on peanut… According to the UGA pest management handbook, the use of a growth regulator is only recommended on irrigated acres where vine growth is excessive. Use of a growth regulator in non-irrigated or in irrigated fields with reduced vine growth will lead to stunted growth and potential yield loss. The growth regulator is NOT recommended on non-irrigated peanuts or in fields that are under stress due to lack of moisture, disease pressure, or other stress conditions. First application = when greater than 50% lateral vines are touching in the row middles (not at 50% lapped—this will be too early). Second application = 14 to 21 days after 1st application. Apply in a minimum of 20 GPA of water.
Always add a nitrogen source with Apogee or Kudos. Apply 1 lb of spray grade ammonium sulfate per acre or one pint of UAN (28%, 30% or 32% nitrogen solution) per acre. Add 1 quart/acre of Crop Oil Concentrate. May not need depending on tank mix partners. For example: do not add crop oil when mixing the growth regulator and nitrogen source with a fungicide. Remember, the more products you add can increase risk for foliage burn. Rain fastness is 6–8 hours. The rate for Apogee or Kudos is 3.63–5.44 oz.
| Boron requirements for peanuts. The UGA recommendation for peanuts is 0.5 lb B/A, preferably split in 2 applications of 0.25 lb B/a each with early fungicide sprays. It takes 1.25 lb/a Solubor to get 0.25 lb B/a and 1 quart (32 oz) of 10 % Liquid Boron to get 0.25 lb B/a. Please be carefull because excessive foliar boron may be toxic to peanuts so do not exceed 0.5 lb B/a for a seasonal total |
There has been a report or two of foliage feeding caterpillars in peanut. The treatment threshold for combined foliage feeders is 4–8 per foot of row depending on the size and condition of the peanut plants. Use a lower threshold for very young plants or plants that are stressed from other factors. Use a higher threshold for healthy plants with ample vine growth.
Hooded Sprayer Calibration
This blog post is from Dr. Porter.
Due to the nature of how they work and the area they are covering, hooded sprayers can be confusing and difficult to calibrate. You can over-simplify or over-complicate the calibration procedures as you work through them. Since there are multiple nozzles under the hood and directed spray nozzles (or banded spray nozzles) associated with the hooded sprayer that can be sprayed simultaneously it is critical that careful consideration is taken when performing a calibration on this system. It is also necessary to emphasize that hooded sprayers cannot and should not be operated at the same speeds as our boom sprayers. We should target at or under 5 mph. Thus, for my examples below I have used 5 mph. READ MORE
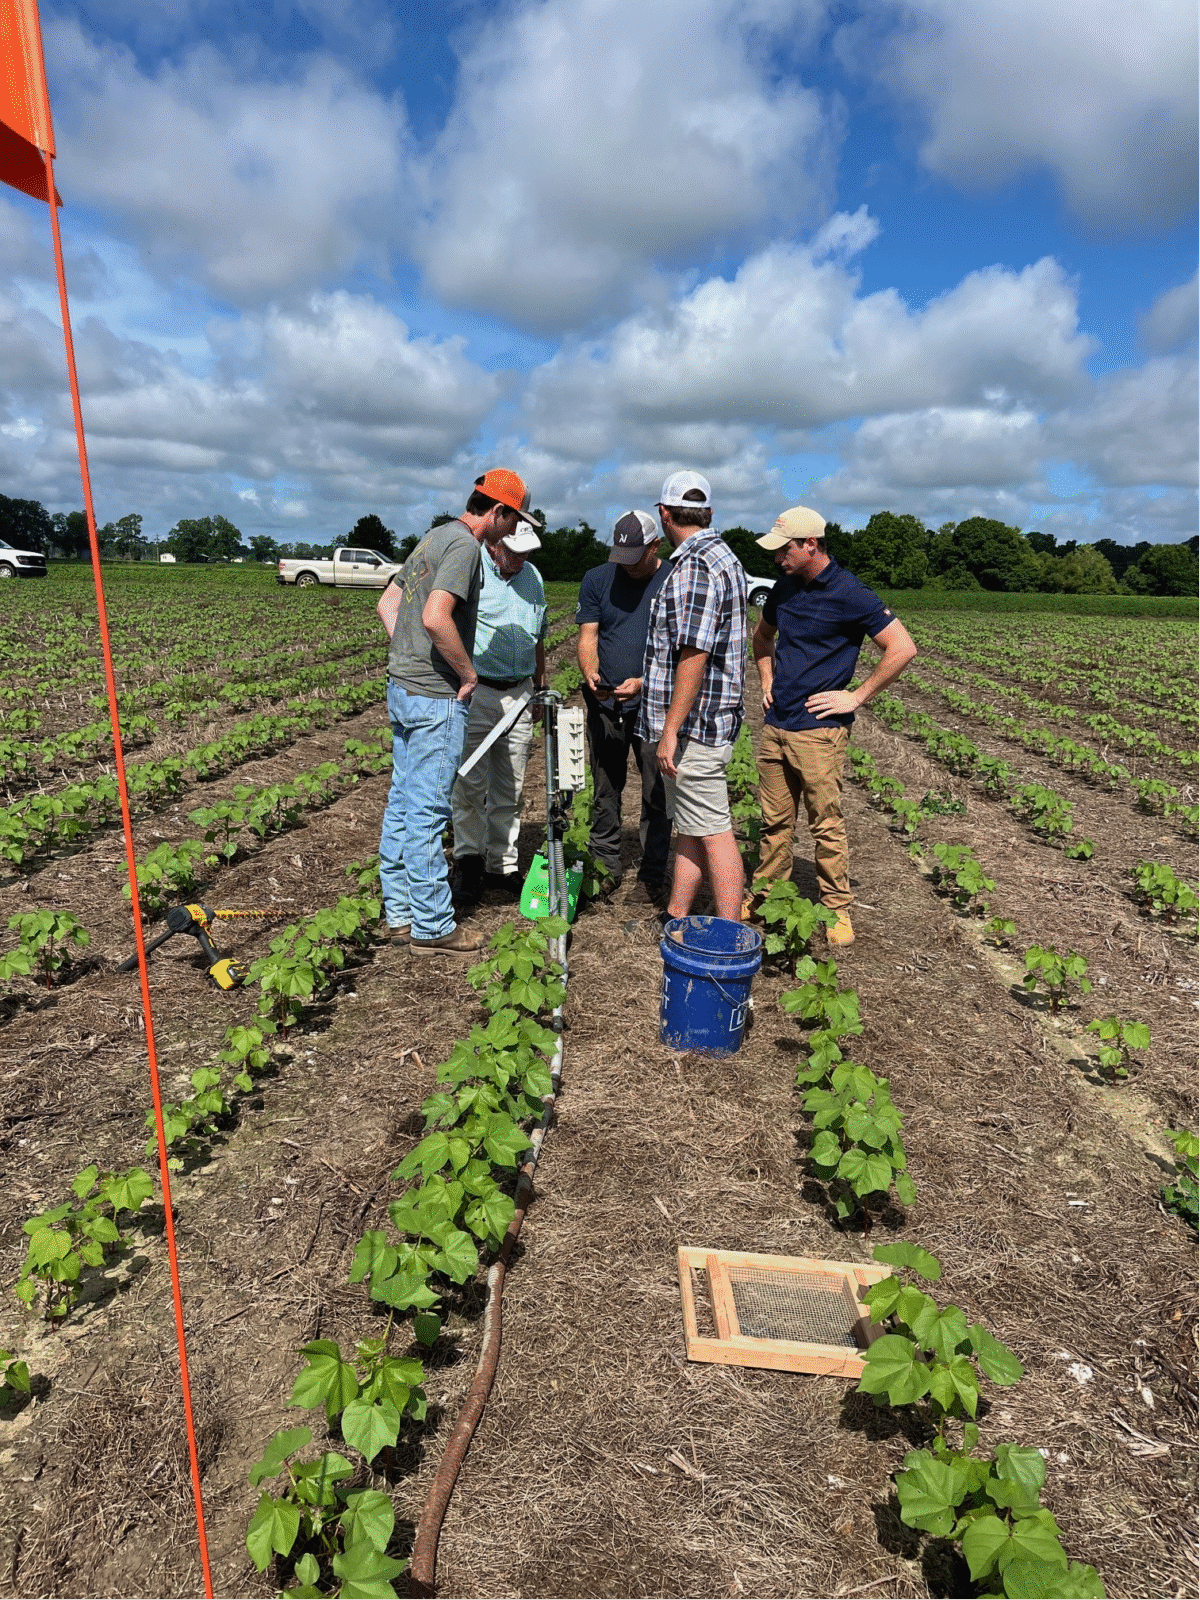
This past week, we got the opportunity to work with the UGA Irrigation Team on a project evaluating the Smart Irrigation app for cotton and peanuts. We are working with several growers in the county on this project. To validate the app, we are using water sensors in the same field. Vinicius Trevisan, a graduate research assistant, is integrating NDVI data into the app to see if that information can help with irrigation scheduling.
Have a safe week and if you have questions please call the office,
Jeremy M. Kichler
Colquitt County Extension Coordinator
The University of Georgia Cooperative Extension does not endorse or guarantee the performance of any products mentioned in this update.